Switching Branches -
Introduction
-
git checkoutcommand is used in Git to switch between different branches or to restore files in your working directory. - It allows you to move from one branch to another so you can work on different features, fixes, or versions of the project.
-
By using
git checkout, you can:- Switch to an existing branch and update your working directory to match its state.
-
Create a new branch and immediately switch to it (using
git checkout -b branch-name). - Restore a specific file or commit if needed.
Note :
-
git checkoutis Multi-purpose command which can be used for switching branches and restoring files. - It is more powerful, but more complex and harder for beginners to understand.
-
So in git version 2.23, a new command
git switchwas introduced to simplify the process of switching branches. -
git checkout=git switch+git restore -
Many developers who have been using Git for years still use
git checkoutsimply out of habit. However, modern teams and new documentation increasingly prefer usinggit switchandgit restorefor clarity.
How to use git checkout ?
- Open the Git terminal (or command prompt) and navigate to the project folder where your Git repository is initialized.
-
Switching to an Existing Branch:
- In previous tutorial we have already created a new branch named feature-1 and now you want to switch to it from the current branch (e.g., main).
-
Use the following command:
-
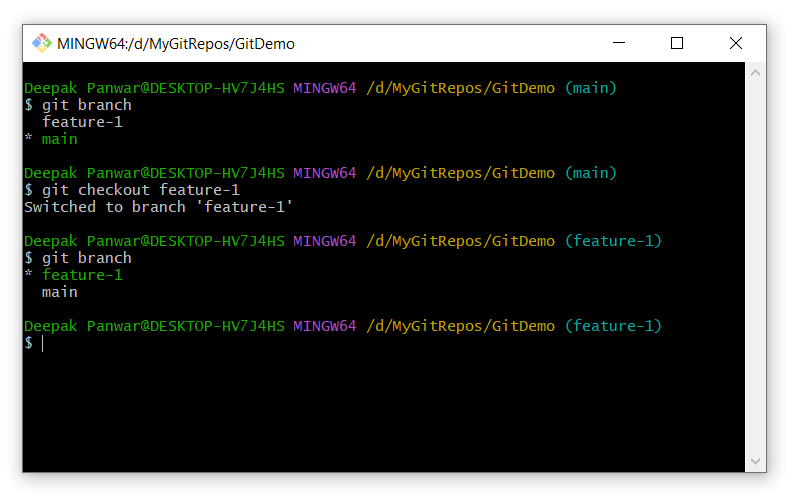
git checkout feature-1 -
This command will switch your working directory to the
feature-1branch, allowing you to work on it independently.
-
-
Verify the Branch Switch:
-
You can confirm whether the branch switch was successful by running:
-
git branch -
This will list all the branches in your repository, and the currently active branch will be marked with an asterisk
*.
-
-
Below is the example of how it looks like:
-
You can confirm whether the branch switch was successful by running:
-
(Optional) Create and Switch in One Step:
-
If the branch does not exist and you want to create and switch to it in a single command, use:
-
git checkout -b new-feature
-
-
This creates a new branch called
new-featureand immediately checks it out, so you can start working on it right away.
-
If the branch does not exist and you want to create and switch to it in a single command, use:
Different ways to use git checkout ?
-
Switch to an Existing Branch::
-
Syntax :
-
git checkout <branch-name>
-
-
Example :
-
git checkout feature-1
-
- Use case: Moves your working directory to the specified branch so you can start working on it.
-
Syntax :
-
Create and Switch to a New Branch:
-
Syntax:
-
git checkout -b <new-branch-name>
-
-
Example:
-
git checkout -b login-feature
-
- Use case: Creates a new branch from the current HEAD and immediately switches to it.
-
Syntax:
-
Switch to a Specific Commit (Detached HEAD state):
-
Syntax :
-
git checkout <commit-id>
-
-
Example:
-
git checkout 3e2f1b7
-
- Use case: Temporarily view or work with a previous commit. Useful for testing or debugging, but not meant for regular development.
-
Syntax :
-
Restore a Specific File from Another Branch:
-
Syntax :
-
git checkout <branch-name> -- <file-path>
-
-
Example :
-
git checkout main -- index.html
-
- Use case: Replaces your current working copy of the file with the version from another branch (like main). Helpful for undoing changes to a file or fetching it from another branch without switching.
-
Syntax :
Switching Branches -
Introduction
-
git switchcommand is used to switch between branches in a more focused and user-friendly way compared togit checkout. - It was introduced to reduce confusion and make branch operations clearer, especially for beginners.
-
By using
git switch, you can:- Move to an existing branch without affecting files.
-
Create and switch to a new branch using
git switch -c branch-name. -
Avoid accidentally overwriting files (which sometimes happened with
git checkout).
How to use git switch ?
- Open the Git terminal (or command prompt) and navigate to the project folder where your Git repository is initialized.
-
Switching to an Existing Branch:
- In the previous tutorial, we have already created a new branch named feature-1, and now you want to switch to it from the current branch (e.g., main).
-
Use the following command:
-
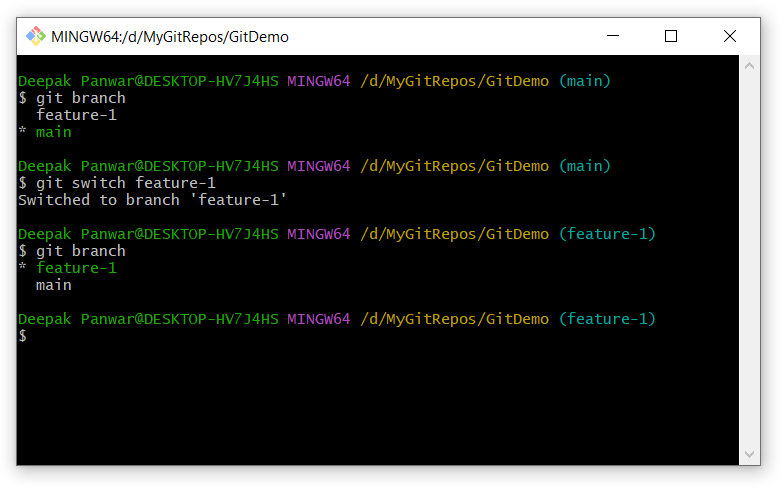
git switch feature-1 - This command will switch your working directory to the feature-1 branch, allowing you to work on it independently and safely.
-
-
Verify the Branch Switch:
-
You can confirm whether the branch switch was successful by running:
-
git branch - This will list all the branches in your repository, and the currently active branch will be marked with an asterisk *.
-
-
Below is the example of how it looks like:
-
You can confirm whether the branch switch was successful by running:
-
(Optional) Create and Switch to a New Branch in One Step:
-
If the branch doesn't already exist and you want to create and switch to it in a single step, use the following:
-
git switch -c new-feature
-
-
This creates a new branch called
new-featureand immediately switches to it.
-
If the branch doesn't already exist and you want to create and switch to it in a single step, use the following:
Different ways to use git switch ?
-
Switch to an Existing Branch:
-
Syntax :
-
git switch <branch-name>
-
-
Example :
-
git switch feature-1
-
- Use case: Switches to the specified existing branch without affecting your working directory if there are no conflicting changes.
-
Syntax :
-
Create and Switch to a New Branch (from current HEAD):
-
Syntax:
-
git switch -c <new-branch-name>
-
-
Example:
-
git switch -c login-feature
-
- Use case: Creates a new branch and immediately switches to it. Useful for starting work on a new feature or task.
-
Syntax:
-
Create and Switch to a New Branch from Specific Commit:
-
Syntax :
-
git switch -c <new-branch-name> <commit-id>
-
-
Example:
-
git switch -c debug-fix 3e2f1b7
-
- Use case: Creates a new branch starting from a specific commit and switches to it immediately. Handy for patching or reviewing older versions of your project.
-
Syntax :
Help Us Get Better Every Day
Your feedback helps us grow! If there's anything we can fix or improve, please let us know.
We’re here to make our tutorials better based on your thoughts and suggestions.